If you represent a tool company and would like to see us review your products, contact our This email address is being protected from spambots. You need JavaScript enabled to view it.
This Old Workshop is proud to support and endorse these fine companies. We vow to never advertise a company who we do not respect or stand by.
![]()
![]()
![]()
![]()
![]()
![]()
![]()
![]()
![]()
![]()
![]()
![]()
![]()
Home - This Old Workshop
Milescraft Router Pantograph
User Rating: 5 / 5

A pantograph is a jig that uses some basic geometric principals to reproduce a shape in a variety of size ratios depending on the length of the arms and the orientation of the pivot points. By following a pattern with a stylist fixed to one of the arms you can follow your design, in this case is a letter printed on a regular 8 ½ x 11 inch sheet. The font size and complexity can vary, so it is useful to run test cuts on scrap wood to get the character size and shape figured out. For the test project I am making a sign for my shop.
 ` You first choose a font size and style, in this case I am using a basic font about 6 inches in height. Since the pantograph will re-create the design smaller than the pattern, you need to figure out the character size needed to reproduce the final size you desire. To make it easier to create my sign I built a panel out of plywood and attached the pantograph to the wood at the fixed pivot point. At the stylist end of the pantograph I located the middle of the letter and attached a sheet protector to the wood with some double sided tape which will allow me to change sheets easily and give the stylist a slick surface to slide along. On the sheet protector, I made some marks that will allow me to set the patterns in the same place and orientation as the previous letter. Then I created a clamping attachment to hold down the sign so I can clamp and loosen the wood when I need to move it to the next letter that will be carved. This is done by attaching a top piece ¾ x 1 x 12 inches in length. This piece is attached across the top of (above) the sign and screwed down to the base panel. Then I attached a bottom crosspiece about an inch and a half below the bottom of the sign. Included with the pantograph are 2 angled pieces that act as a cam to lock the sign into place and keep it from moving while you carve with the router. It is very important that the sign be locked into place firmly otherwise your workpiece will slide and the sign will be ruined. I speak with the voice of experience as I have ruined a few signs getting this technique down. You can determine the spacing of your letters by making a few test carvings to see how far you need to slide the sign to the next character. Once you get the set up where you need it, you can easily reproduce any number of signs. Then if you need to create a different size or shape of sign you can move around the locking bars and reposition the cam to lock down the new sign into the jig panel.
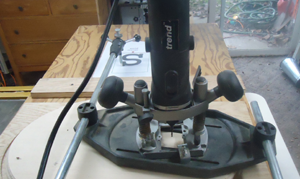 Next we turn to the router. You will need to choose a router small enough to fit on the base plate and allow you to lock it down. My choice for this job is my T4-el from Trend routing technologies, a brilliantly designed router. Light enough to move around easily but powerful enough to keep it cutting through most any type of wood. I have also used my 7301 Porter-Cable Trim Router, which also worked very well. The locking system for the pantograph is versatile enough to allow the use of a variety of routers I am sure, but I only have these two small sized routers to work with. Larger routers like my Hitachi M12V or the Porter-Cable 693PK are just to large to fit onto the pantograph router plate, not to mention heavy, making the pantograph hard to move with any accuracy.
Now we turn to the selection of router bits to use. I suppose you can use nearly any shape bit that will fit into your router but you will really want something fairly basic. A round nose, straight spiral cutter or even a v-groove bit will work nicely depending on the shape of the cut you want. Experiment with different shaped bits and see what the result looks like. Once you decide on a bit you are ready to make some cuts. With the router locked in place, you can experiment with the cutter depth. I prefer the ability to plunge cut on the Trend T4-el over the fixed cutter on my Porter-Cable 7301 but either will work. You just need a steady hand when you lower the stylist down on to the pattern, if you are off in alignment, your end result will show it. Once all your test cuts are done, everything is aligned and in place you can now rout to your hearts desire. I really do like using the pantograph; I have carved variety things, from signs to cupboard doors with letters to Celtic patterns. You can find all sorts of uses for the Router Pantograph, and at around $50 it is not going to leave large holes in your wallet or purse. A fun place to look for patterns is in coloring books, their line art is ideal for copying. You can also find images and fonts on the internet and most are free
Login
podcast
More of our trusted sponsors and friends. Please visit these companies when you need tools or supplies.
![]()
![]()
![]()
![]()
![]()
![]()
![]()
![]()
![]()
![]()
![]()
![]()
![]()